
2 easy outdoor DIY projects
Ever get the urge to make outdoor decorative items but don’t know where to start? Here are two DIY projects you can finish in just a few hours. You may already have most of the supplies or can find them at a local dollar store or home improvement center.

footprint doormat
You see this every day, why not personalize it for your family?
materials you’ll need
- pencil or pen
- paper
- scissors or box cutter
- masking or painter’s tape
- foam paint brush
- acrylic paint – outdoor paint is best
- natural coir rug (or similar)
- trace your feet
Use a pen or pencil to draw around the outside of each foot and between each toe just a bit. If you’re drawing the whole family’s feet, label each drawing at the top so they don’t get mixed up.
- create your stencils
Use your scissors or box cutter and cut out the inside of each drawing to create your stencils. Once you’ve cut them all out, you’re ready to move on to the next step.
- plan your design
Pick where you’d like each pair of feet to be on your doormat and tape the stencils in place. You can trim the sides of the stencils if they won’t all fit. If you have a large family, just use one foot for each person.
- paint those feet!
Use the foam brush to paint the inside shape of each stencil. It’s best to paint three or more coats instead of trying to get it perfect with just one coat. Use a hair dryer to speed up the drying process.
- it’s time for the reveal
When the final coat of paint is dry, remove the stencils one at a time. Do it slowly, since the paint can sometimes make stencils stick to the doormat.
- enjoy your artwork
Your beautiful doormat is now ready to be proudly displayed outside your door. We guarantee that you’ll smile every time you use it.

tin can lanterns
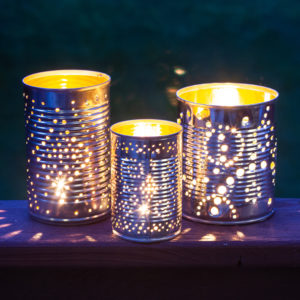
These fun-to-make lanterns do double duty, as glowing lights for nighttime and as decorative items during the day.
materials you’ll need
- empty tin cans
- pencil and paper
- scissors
- tape
- towel
- hammer
- small to medium-size nail
- tealight or votive candles
- pick your designs
Draw your own on paper or search online for “tin can lantern patterns” to print. Tape a design to each can before moving on to the next step. If you’re feeling extra creative, you don’t even need a pattern.
- prepare your cans
Clean each can and remove the labels. Fill each one with water to about a half-inch from the top and put them in the freezer overnight. The ice will keep the cans from bending during step three.
- punch out your pattern
Fold your towel and lay it on a hard surface to hold your cans steady. You’re ready to start punching holes! Want to add a handle? Punch two holes near the top on opposite sides of the can. Use a coat hanger or craft wire for the handle.
- remove the ice
Take off your patterns and rinse each can under warm water until the ice can be removed. Set cans aside to dry.
- let there be light!
Put a tealight inside each can, light them and enjoy your new lanterns. You can also use battery-powered candles. If using real candles, put lanterns on fire-safe surfaces and warn your kids that the outsides can be hot to the touch.


