
Fall’s the perfect season to pumpkin-spice up your home decor. These DIY activities are cheap, easy and a-maize-ing fun for the whole family.
autumn tablescape
So, what’s a tablescape? It’s a fun way to decorate your table for any season or occasion. It doesn’t matter the table size, there are fun ways to decorate any tabletop. It can be cheap or even free, depending on what you might have laying around.
First step? Look through your home for items that might work. Tablecloths, faux greenery and pumpkins, candlesticks, candles – the options are endless. Next, take a tour of your own yard and neighborhood to gather dried flowers and plants, pinecones, branches… whatever catches your eye. Remember to make sure it’s OK to gather supplies from public areas.
By now, you probably have an idea about how your tablescape will look. If you’re still missing some supplies, head out to your local dollar or craft stores to finish up your list on the cheap.
Now’s the really fun part! Arrange the items you’ve chosen in any way you want, and now you have a beautiful tablescape that didn’t gobble up your budget.
gourd-geous centerpiece
If you’re looking for a smaller decoration for your table, this pumpkin centerpiece autumn work perfectly.

supplies needed:
· Garbage and shopping bags in different sizes
· Masking tape
· Newspaper
· Water
· Flour
· Various shades of orange paint, any kind
· Brown paint for the stem
· Paintbrush
· A wood dowel or stick, tall enough to go stack each pumpkin on top of one another
optional:
· Spray urethane
· Garland and faux leaves to decorate the pumpkins
what to do:
- Stuff three different-sized plastic bags with newspaper and seal the top.
- Using the masking tape, shape the bags into pumpkins.
- Make paper mâché paste by mixing two cups of water with ¾ cup flour.
- Tear up enough newspaper into strips to cover each pumpkin at least twice, dip each strip into your paper mâché mixture, and apply to the bags until they’re fully covered. Make sure your smallest pumpkin has a paper mâché stem. Tip: allow at least a full day for the pumpkins to dry
- Make sure your pumpkins are fully dried, then start painting. Use different shades of orange to make them pumpkins look as realistic as possible, and paint the stem of the smallest pumpkin brown. Then once the paint has dried, use the optional spray urethane to seal each pumpkin.
- Once the paint has dried, put a hole through the top of the biggest one, the top and bottom of the middle one and the bottom of the top one. Stick the dowel through, stacking the pumpkins largest to smallest. Once that’s done, use the optional garland and faux leaves to decorate the pumpkins.
You’re all set! Now your table will be pumpkin to talk about.
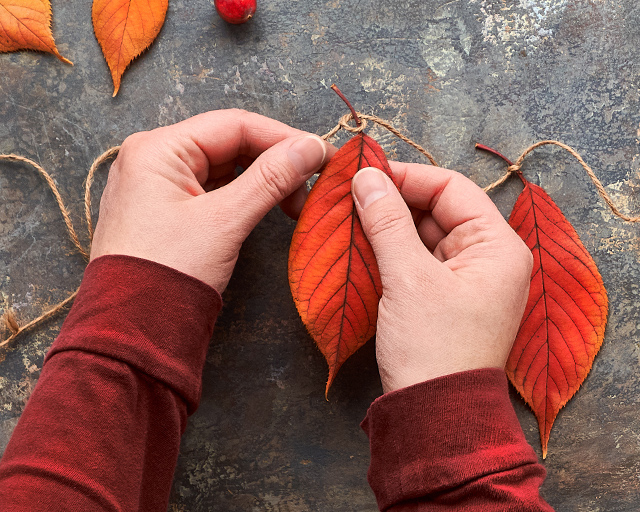
fall leaf garland
We think you can never make too many garlands, and here’s one that’ll leaf you smiling.

supplies needed:
· Faux leaves from a craft or dollar store
· String, twine or ribbon
· Glue
· Glitter in fall shades
· Hole punch
optional:
· decoupage glue
what to do:
- Paint a leaf completely with the glue, then sprinkle glitter all over it. Repeat this process, alternating the glitter colors. Optional: when the glitter is dry, paint each leaf with decoupage glue to keep glitter from shedding.
- Once the leaves have dried completely, punch a hole at the top of each leaf.
- Cut various lengths of your string and attach a piece to each leaf.
- Cut out a piece of your string, twine or ribbon long enough to hang all of your leaves and attach the shorter pieces in alternating lengths to the larger string.
That’s it! This garland is the perfect way to add some sparkle to the season.
pumpkin candy jars
These candy jars are perfect for treats and a fantastic way to create festive fall centerpieces with some items you have around the home.

supplies needed:
· mason jars
· white primer paint
· orange acrylic paint
· brown acrylic paint
· black acrylic paint
· wood pegs
· green construction paper
· paint brushes
· scissors
· glue gun
· newspaper
what to do:
- Make sure the glass jars you want to use are clean and free of any labels. Once ready, lay out some newspaper and then apply a layer of white primer paint to the jars so they will be ready for the more colorful orange paint.
- After the white primer paint has dried, apply the orange paint to the jars. At this time, you can also paint the lids of the mason jars and the wood pegs brown. If you would like to make your pumpkins look more like jack-o‘-lanterns, use your black paint to give them eyes and smiles. Once you’re done painting, let the jars and lids sit out to dry.
- While you’re waiting for everything to dry, cut the green construction paper into the shape of leaves. Once the leaves are cut and the lids and wood pegs are dry, you’ll be ready to start gluing them together. Glue the leaves to the bottom of the wood pegs and then glue peg/leaf combinations to the top of the lids.
- Now that your jars are dry and the lids are decorated, you’re all set to fill the jars up with your favorite fall candy.
These festive candy jars are great to set out on tables for Halloween parties, Thanksgiving get–togethers or any other events you have this autumn.
Related Posts